7 Jun 2012

How to Fix Wireless Network Issues in Microsoft Windows 7

Microsoft Windows 7 supports a broad range of network adapters and chipsets for both wireless and wired networks. Despite that your wireless network connection may stop working due to various reasons like wireless setting problem, internet connection or router problem with your PC. Windows 7 comes with a built-in troubleshooter that you can use to repair a broken network connection.

Step1: To fix your wireless network, troubleshoot your internet connection issues first. Go to Control Panel>Network and Internet. Then click the Network and Sharing Center link and follow the on-screen prompts.

Fix Wireless Network Issues in Microsoft Windows 7Step2: When you’re unable to communicate with your router or modem, check your network adapter. Go back to the Network and Internet window>click on the Network Adapter link>click Next> click the Wireless Network Connection button>click Next. Follow the on screen prompts to fix your network adapter problem.

Step3: If the troubleshooter finds fault with the adapter, update its drivers. From Start button>right click on the Computer>select Manage. Enter admin password and click Continue. When the Computer Management window will open, click Device Manager.

Step4: If the problem continues, it’s best to delete the connection and just create it again by clicking the Setup a New Connection or Network link in the Network and Sharing Center window and entering the correct settings. For removing this connection, go to Network and Sharing Center window> click Manage wireless networks in the left hand panel. Click your wireless network name and then click the Remove button.

Step5: Restart your computer. When done, click the wireless icon in the system tray and you will see your wireless network listed there. Click it and then click Connect. 

Note:To get more help on windows 7 then you can reach online technical support service desk of V tech-squad at their Toll Free No +1-877-452-9201.

See also: How to setup a Home network in Windows 7


6 Jun 2012

How to setup a Home network in Windows 7

Home network is a simple and useful way of sharing an Internet connection between multiple devices in your home. To setup home network, you will need a router and a network adapter for each computer. If you want to connect to the Internet, you'll need to have an account set up with an Internet service provider (ISP). ISP will help you to make windows 7 setup with your home network.  Follow the given steps to set up home network in windows 7:

Step1: First, select a wireless router. If your router is compatible with Windows 7, you can set it up automatically using the latest version of Windows Connect Now (WCN) on Windows 7.

Step2: Set up the router and plug it into a power source. Once connected, Windows 7 will automatically search for the drivers and install them. With WCN, you simply need to click the Network and Sharing Center icon in your system tray and connect with your default network and follow the instructions on your screen.

Step3: After setting the router, create your home group to start sharing files and printers. Go to Control Panel and select the home group. When the initial Homegroup window appears, you’ll be informed that there is currently no Homegroup on the network.

Step4: Click the Create a Homegroup button. When the first screen in the Create a Homegroup wizard appears, you’ll be prompted to choose what libraries, or types of files, you want to share on the Homegroup.

Step5: Once you choose what it is you want to share, Windows 7 will create the Homegroup and you’ll then see the Homegroup password. This is the password that other Windows 7 systems will need in order to join and access the Homegroup.

Step6: After completing all the steps, click the Finish button .When a Homegroup is established on your network, other Windows 7 systems can join the Homegroup using the same password.

Note:
To get more help on windows 7 ,you can reach online technical support service desk of V tech-squad at their Toll Free No +1-877-452-9201.

See also:How to Share Printers in Windows 7


31 May 2012

How to Make Windows 7 Bootable USB

Make Windows 7 Bootable USB
Now you can create Windows 7 Bootable USB and install it through a USB drive. USB installation method is very helpful when you are unable to use the Windows 7 setup DVD / CD. In the latest netbooks, mostly there is no DVD drive. So if you want to install Windows, you can use this alternative i.e. USB Pen drive. The given steps will help you make a Windows 7 bootable USB drive.

Step1: From the Start menu, click on Run.  Type cmd in Run box and press Enter.

Step2: Type diskpart like ‘c:\> diskpart’ and press Enter. It will run diskpart utility in a separate window.

Step3: Connect your pendrive to a USB port. Your pendrive should have 4GB or 8GB space for that matter. Now go back to the diskpart console and type ‘listdisk’ and press Enter (DISKPART>list disk). This will list the various storage devices available. You can see the disk and size column of the disk. Disk will define your pendrive, it may be Disk 1 or Disk 2 or any number.

Step4: Select your pendrive disk and press Enter. You can also see the details of the disk. To check the details of the disk just type ‘detail disk’.

Step5: Now you have to run a series of commands in the following order:
-clean
- create partition primary
- select partition 1
- active
- format fs=fat32

Step6: The above steps will take some time and format your pen drive. After completing the format, you have to run ‘assign’ and ‘exit’ command.

Step7: After completing the all above steps, put in your original Windows 7 DVD in your DVD drive. Now go to My Computer, and open the contents of DVD Drive. Copy all the contents of DVD drive and paste into the USB disk.

Step8: Now remove the USB drive safely and use it install windows 7 on your computer or laptop.

If you want to make bootable disk  in windows 7 ,you can follow this blog-How to Make Bootable Disks in Windows 7 . 

See also-How to Create and Use a Windows 7 Password Reset Disk.


24 May 2012

How to Change Startup Programs in Windows 7

Microsoft has made many changes to the Windows operating system. Suppose you want install various application on your windows PC over the time because of slower boots up. Startup programs loads from specific folder on the hard drive when your system started. By changing startup program settings you can improve your Windows PC startup time and performance. Follow the given steps to fix your problems.
If your windows 7 performance slow then follow this article to find the reasons:Reasons Why Windows 7 Performs Slow.
  • Start your computer. 
  • Click on “Start” button and type “msconfig” in the search text box and press enter to open System Configuration Console.Or Click the Windows Key and the R at the same time to open the Run Command and Type “msconfig” and Click OK; this will open the System Configuration .    
    Change Startup Programs in Windows 7
  • In System Configuration, go to the Startup tab.
  • Uncheck all programs that you don’t want to automatically start up ( Note that some programs should not be unchecked because they are important for Windows to function optimally.).
  • Click Apply. The startup programs are now disabled. Only the Checked programs will now begin at startup.
See more blog on windows 7 : How to Setup a USB Flash Drive to Install Windows 7
                                             How to Run Windows Update in Windows 7


22 May 2012

How to Turn Off UAC in Windows 7

User Account Control (UAC) is an in-built feature in Microsoft Windows that you use to help prevent potential security breaches in your system. It prevents unauthorized changes to your computer. In Windows 7, you have the ability to set protection and notification which you want. If you want to turn off the UAC in windows 7 then follow the given steps:
Firewalls protect your computer from hackers ,if you want to configure firewall connection in your computer then follow this blog-How to configure the Windows Firewall in windows 7 .
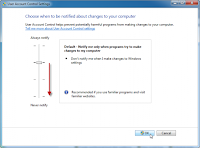
  • From start menu, go to control panel then user accounts and family safety > user accounts > Change User Account Control Setting. "Change User Account Control Settings" appears in the list for you to select. you can also type in this command from the Run menu:
          C:\Windows\System32\UserAccountControlSettings.exe
    Turn Off UAC in Windows 7
  • To turn off UAC, move the slider to the Never notify position, and then click OK.  If you're prompted for an administrator password or confirmation, type the password or provide confirmation.
  • To turn UAC back on, move the slider to choose when you want to be notified, and then click OK.  If you're prompted for an administrator password or confirmation, type the password or provide confirmation.
  • You will need to restart your computer for UAC to be turned off.
If you want to set restore point in windows 7 then follow this article-How to Set Up a Restore Point in Microsoft Windows 7 .

Note:To get more help on windows 7 then you can reach online technical support service desk of V tech-squad at their Toll Free No +1-877-452-9201.

17 May 2012

How to Make Bootable Disks in Windows 7

make bootable disks in windows 7
A boot disk is capable to recover your windows 7 computer in case your system gives any error. Inserting a boot disk into your computer allows you to access the recovery options that are available on the system because the system boots off the disk instead of the hard drive. you can access system recovery options by using a Windows installation disk, but if your Windows 7 computer didn't come with one, you need to create a boot disk.
If you want to configure your firewall setting then follow this blog-How to configure the Windows Firewall in windows 7 .

Step1: Click on the Windows orb and then click "Control Panel."

Step2: From control panel, click "System and Maintenance" and then click "Backup and Restore."

Step3:  Click "Create a System Repair Disc" in the left column of the window. The "Create a System Repair Disc" dialog window opens.

Step4:  Insert a blank disk into the disk drive of your computer.

Step5: Click on the disk drive that contains the blank disk from the drop-down box next to "Drive" on the pop-up window.

Step6: Click on the "Create Disc" button. The system creates a bootable system repair disk. Click "Close" when the process is completed .Bootable disk is ready and then eject the disk and store it in a safe place.

If you want to resolve Bootmgr missing error in windows 7 then follow this article-How to Resolve Windows 7 BOOTMGR Missing Error.

Note:You can reach V tech-squad online technical support for any of your queries relate to Windows 7 Support at their Toll Free No +1-877-452-9201.
 

15 May 2012

How to turn off the Warnings for Internet Explorer on Windows 7

turn off warnings for internet explorer on windows 7
Microsoft's Internet Explorer Web browser received much negative criticism with the release of Internet Explorer version 6, included with Windows XP in 2001. The criticisms were mostly about security issues and how IE 6 left many security holes opens with the default configuration. In an effort to increase Web browsing security, Microsoft has released new versions of Internet Explorer with more default security configurations that warn you about potentially harmful content on the Internet. You can turn off these warnings in Internet Explorer with Windows 7.Follow the given steps to turn off the warnings for internet explorer on windows 7.

If you want to turn off your system firewall setting in windows 7 then follow my blog-How to Turn off Your Firewall in Windows 7, which i have discussed in same blog.

Step1: From start button, click on all programs.

Step2: Click on internet explorer and then press the alt key to reveal the menu bar.

Step3: Click on the tool menu and select internet option then security tab and click custom level.

Step4: Click "Enable" next to "Allow Previously Unused ActiveX Controls to Run without Prompt." And click "Enable" next to "Download Signed ActiveX Controls."

Step5: Click "Disable" next to "Only Allow Approved Domains to Use ActiveX without Prompt."

Step6: Click "Enable" next to "Don't Prompt for Client Certificate Selection When Only One Certificate Exists."

Step7: Click "Enable" next to "Launching Applications and Unsafe Files."

Step8: Click "Enable" next to "Launching Programs and Files in an IFRAME."

Step9: Click "Enable" next to "Allow Programmatic Clipboard Access." 

Step10: Click the "OK" button to save and apply the settings.

Step11: Click on the "Advanced" tab. And uncheck "Notify When Downloads Complete."

Step12: Uncheck "Show Friendly HTTP Error Messages”.
            Uncheck "Warn About Certificate Address Mismatch."
            Uncheck "Warn if POST Submittal Is Redirected to a Zone That Does Not Permit Posts."

Step13: Click "OK" to save the settings, and restart Internet Explorer for the settings to take effect.

If you are getting bootmgr missing error in windows 7 then you can solve this problem from this article-How to Resolve Windows 7 BOOTMGR Missing Error.

Note:If you want to get technical support  for windows 7 then you can reach online technical support service desk of V tech-squad at their Toll Free No +1-877-452-9201.