Windows XP users may wish to directly upgrade to Windows 7 due to advanced features and utilities available in the latter version. To upgrade you will need to back up all data on your computer, boot to the Windows 7 installation disc and perform a custom upgrade. Follow the given instruction to upgrade to Windows 7 operating system.
If you want to install windows 7 on netbook computer ,then follow this article-How to Install Windows 7 on a Netbook With No Optical Drive
Step1: Back up all files that are on your computer. First check the Windows XP version from Start menu->right-click My Computer->click Properties. If you are running a 32-bit version of Windows XP, then you can only upgrade to the 32-bit version of Windows 7. A 64-bit Windows XP version will be eligible for 64-bit Windows 7 version.

Step2: Insert the Windows 7 install disk in the CD/DVD drive and boot your computer.
Step3: Click "Install Now" and click "Get important updates for installation". If you have an active Internet connection then Windows 7 will download updates to the Windows 7 installation program.
 Step4: To accept Terms of Use, click the check box "I accept" and then click Next.
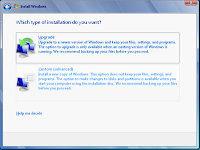
Step5: Since Windows XP cannot be upgraded to Windows 7 directly, you will need to choose the “Custom Option” to install Windows 7.
Step6: Select the hard drive partition and Click Next -> click OK. This will begin the Windows 7 installation process. Follow the on-screen prompts to install Windows 7. You need not necessarily partition your hard drive here unless you want to dual boot. Remember, Windows XP won’t work with Windows 7 even if you dual boot.
During this procedure, your computer will boot several times which is normal. You need not be worried about it.
If you want to install windows 7 on netbook computer ,then follow this article-How to Install Windows 7 on a Netbook With No Optical Drive
Step1: Back up all files that are on your computer. First check the Windows XP version from Start menu->right-click My Computer->click Properties. If you are running a 32-bit version of Windows XP, then you can only upgrade to the 32-bit version of Windows 7. A 64-bit Windows XP version will be eligible for 64-bit Windows 7 version.

Step2: Insert the Windows 7 install disk in the CD/DVD drive and boot your computer.
Step3: Click "Install Now" and click "Get important updates for installation". If you have an active Internet connection then Windows 7 will download updates to the Windows 7 installation program.
 Step4: To accept Terms of Use, click the check box "I accept" and then click Next.
Step5: Since Windows XP cannot be upgraded to Windows 7 directly, you will need to choose the “Custom Option” to install Windows 7.
Step6: Select the hard drive partition and Click Next -> click OK. This will begin the Windows 7 installation process. Follow the on-screen prompts to install Windows 7. You need not necessarily partition your hard drive here unless you want to dual boot. Remember, Windows XP won’t work with Windows 7 even if you dual boot.
During this procedure, your computer will boot several times which is normal. You need not be worried about it.
See also: How to Make Windows 7 Extremely Fast
No comments:
Post a Comment