Microsoft Windows 7 themes are very popular and easy to personalize your computer desktop. Some desktop themes may come already installed with the computer's operating system. If you want to install additional themes in windows 7 system then you can do it(see:How to Customize your Windows 7 PC). Follow the given steps to add more themes in windows 7 system.
***Sometimes the themes that you download do not have the best resolution and screen fit that you desire in your Windows 7 PC. In that case, you can download the Universal Theme Patcher software.
Step1: To use non-Microsoft visual style, first you need to download Universal Theme Patcher. This software consists of uxtheme.dll file which allows you to use various visual styles.
Step2: From this website”www.freewaregeeks.com” download the UniversalThemePatcher.zip folder.
Step3: Now open the zip folder and click on the ‘UniversalThemePatcher_20090409’ folder.
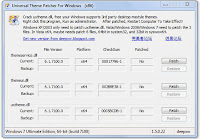 Step4: Select UniversalThemePatcher-x64 (for Windows 7 Ultimate Edition 64-bit). When dialog box will open up, select English from User Interface Language box.
Step5: Now click on the Yes button.Check the patch from Universal Theme Patcher For Windows and close it.
Step6: Now you can download themes and save into C:\Windows\Resources\Themes. Then right-click on the desktop ->Personalize->select theme.
See also: How to customize Windows Start button in Windows 7
Reasons Why Windows 7 Performs Slow
No comments:
Post a Comment