You can create a Windows 7 backup image file which copies all the data,installed software and settings all stored in one backup image, which can be restored in case of a Windows damage or failure. This feature is in-built in Windows 7 and known as Windows backup and restore.
When restoring a backup image, the image overwrites your entire system and restores it to the point when the backup image was created. In Windows 7 you can create a system image from the Backup menu. Follow the given steps to create a windows 7 backup image.
To know better backup and restore utility then follow this article-How to Use Backup and Restore in Windows 7.
Step1: From start menu, go to the control panel and choose system and security.
Step2: Click on Backup and Restore option from the "System and Security" window. This opens up the Windows 7 "Backup and Restore" center.
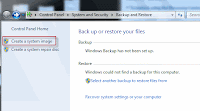 Step3: Click on Create system image in the menu on the left side of the window.
Step4: Choose where you would like the backup to be saved. This must be on a separate drive or DVD. Windows 7 will not allow you to save a system image to your primary hard drive. Then Click "Next."
Step5: Click on Start backup option to save the system image. Windows 7 will give you the option to create a system repair disk along with the system image. Click "Close" after the backup image is completed.
Create a system repair disc in windows 7 then follow my blog -How to Create a Windows 7 System Recovery Disc, which i have discussed in same blog.
Note:If you want to get technical support for windows 7 then you can reach online technical support service desk of V tech-squad at their Toll Free No +1-877-452-9201.
No comments:
Post a Comment