16 Aug 2012

How to Customize your Windows 7 PC

Windows 7 provides customize option which gives a unique style and at the same time enhances your experience as a user. New themes, backgrounds, gadgets, mouse pointers, user images, and more give options to make your PC look like the way you want.

If you want to change Startup programs in windows 7,then follow this blog-How to Change Startup Programs in Windows 7

Change the Welcome Screen:

You can change two things in the Welcome Screen and that is your profile picture and apply a software to change the background image. Follow the given steps:
  • Start->Control Panel->User account
  • Click the Change your picture link.
  • Select a picture from the default Windows 7 pictures, or click the Browse button for more picture links and navigate to an image of your own to use instead.
  • Click the Change Picture button.
To change background image, follow the given steps:
  • Start button-> enter 'regedit' into the Search bar. Right-click Regedit.exe> click Run as administrator.
  • Right click HKEY_LOCAL_MACHINE and select Find.
  • Search for OEMBackground, which should be in Computer\HKEY_LOCAL_MACHINE\SOFTWARE\Microsoft\Windows\CurrentVersion\Authentication\LogonUI\Background. If the key does not exist, add a new DWORD value with the name OEMBackground.
  • Double-click on the entry OEMBackground, and change the value from 0 to 1.
  • Open Windows Explorer and go to the following path: %windir%\system32\oobe.
  • Create a new folder named Info, and open it.
  • Create a new folder within Info named backgrounds.
  • Rename your desired wallpaper as backgroundDefault.jpg and place it inside the folder backgrounds (images must be less than 245KB in size).


Change The Windows Theme:

  • To change windows 7 theme: Right-click the desktop and select Personalize.
  • Choose the default theme or browse the theme from online. And Apply it.


Create A Custom Desktop Slideshow:

  • Right-click desktop-> Personalize-> Desktop Background
  • To create a slideshow, you need to select any entry from the Picture location drop-down menu.
  • Choose a Picture position and time interval to Change picture
  • Click the Save changes button


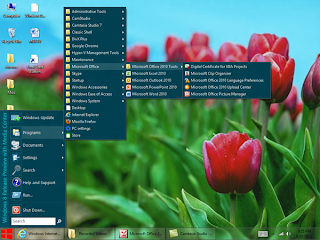
Customize Windows start button:

How to Customize your Windows 7 PC
  • Right-click the "Start" button-> click Properties
  • The Task bar and Start Menu Properties dialog box appears on the screen
  • Click the "Customize" button. The Customize Start Menu dialog box appears on the screen.
  • Type the number of programs you want to display into the field to the right of "Number of Recent Programs to Display" at the bottom of the dialog box. Then click OK two times to save your changes and exit the dialog box.


Change Windows Startup Sounds:

  • Start->Control panel->Hardware and Sound->click Change System Sound from Sound option.
  • Choose Sounds and Sound scheme and then click OK.
  • Add Your Downloads Folder to the Start Menu:
  • Right-click the Start button-> click Properties-> Click the Customize button
  • Scroll down until you find the entry for 'Downloads'. And finally click OK.


Move the taskbar:

Click an empty space on the taskbar, and then hold down the mouse button as you drag the taskbar to one of the four edges of the desktop. When the taskbar is where you want it, release the mouse button.

How to Customize your Windows 7 PC 

Add some gadgets:

  • Right-click on the Desktop ->click Gadget->chooses the Gadget.
  • After that you can resize, move, restore and change the gadget.

13 Aug 2012

How to Set Up your Home Wireless Network with Windows Vista and XP

A home network allows you to share pictures, applications as well as a single Internet connection with other computers and devices in your home. Often this is the fastest method in copying files from one PC to another or a device. The given steps will help you set up home network in windows Vista and XP.

If you want to set up home network in windows 7, then follow this blog-How to setup a Home network in Windows 7
 
Home network with Windows Vista:
How to Set Up your Home Wireless Network with  Windows Vista and XP

Step1: From the Start button, go to the Control Panel.

Step2: From Control Panel-> click Network and Sharing Center-> on the left side options, click "Set up a Connection or Network”.

Step3: Select “Set Up a Wireless Ad Hoc”-> Click Next

Step4: Click "Next" again on the new window-> Insert a Computer Name which you want -> Choose the security type "WPA" for wireless network.

Step5: Then enter a "Passphrase" or password and follow the onscreen instruction.

Step6: From “Network" options, you can share files with other computers using computer name and Passphrase.

Home network with Windows XP

Step1: From Start button->Control Panel-> select "Network and Internet Connections.

Step2: Click "Network Setup Wizard->click Next. Review the network setup checklist if necessary. Click "Next" again.

Step3: If Windows XP detects disconnected hardware, and you're sure your equipment is properly installed, you may select "Ignore disconnected network hardware." In the next window, select the option marked, "This computer connects directly to the Internet. The other computers on my network connect to the Internet through this computer". Click "Next".

Step4: Select your Internet connection from the list under "Connections." Click "Next" again, and then type a description and name for your computer, if you like. Click "Next," and choose your workgroup name. And follow the onscreen instructions.

See also: Steps to Repair Microsoft Windows Vista
                What to Do When Microsoft Windows XP Won't Shut Down


9 Aug 2012

How to Disable Hibernation in Windows 7 using Command Line

Hibernate was designed to speed up shut downs and restarts and save power in computers. When you activate Hibernate, Windows takes a snap shot of your current session (all your running programs, open files, etc.) and writes that information to your hard drive. However, the feature uses hard drive space equal to the amount of memory installed on the machine to use. Thus you can disable the Hibernate feature in your computer. Follow the given steps to disable Hibernation mode in Windows 7 using Command Prompt.

How to Disable Hibernation in Windows 7
Step1:  Click the "Start" button and select "All Programs"-> Click Accessories->right-click Command Prompt -> select Run as administrator.

Step2: At the command prompt, type powercfg.exe /hibernate off, and then press Enter(for enable type hibernate on).

Step3: Type exit and then press Enter to close the Command Prompt window.

See also: How to Turn Off UAC in Windows 7
                How to Use Backup and Restore in Windows 7

***The hibernation file is called hiberfil.sys and it’s under the root of the system drive.
 

8 Aug 2012

How Do I Restore the Windows Sidebar?

How Do I Restore the Windows Sidebar?
If your Microsoft Windows Sidebar disappears or stops working on your desktop, it may be because of Software changes or a poorly built-in gadget on your computer.  If you want to restore your windows sidebar on your desktop, you can follow the given steps:

If you want to change Windows startup programs, then follow this blog-How to Change Programs at Windows Startup

Step1: Click the "Start" button and select "All Programs".

Step2: Click Accessories->right-click Command Prompt -> select Run as administrator. Type your password and give the confirmation.

Step3: In the Command Prompt window, type: 
Regsvr32 atl.dll -> press Enter
Regsvr32 "%ProgramFiles%\Windows Sidebar\sbdrop.dll -> press Enter
Regsvr32 "%ProgramFiles%\Windows Sidebar\wlsrvc.dll ->press Enter
exit -> press Enter

Step4: After exiting the Command Prompt window, restart your computer. And check that windows sidebar is working properly or not.Find here, the best way to enhance your system performance.


6 Aug 2012

How to Fix Windows 7 Activation Error 0xC004F061

How to Fix Windows 7 Activation Error 0xC004F061
During upgrade of Windows 7, you may receive the error 0xC004F061. It occurs when you try to install an upgrade version of Windows 7 after you have formatted your hard drive or when previous version of Windows wasn't installed on your computer when Windows 7 was installed. If you want to upgrade the windows 7, you need to install the previous version. Windows 7 setup can also give the error that you have entered an invalid Windows product key. Follow the given steps to solve this problem.

If you want to fix windows 7 error ,then follow this blog-How to Fix Windows 7 Error
 
Step1: To activate Windows 7, you will need to install your previous version of Windows. For any help, you can visit Microsoft Support website.

Step2:  Type your license key correctly. Otherwise Look for the license key sticker on your computer or inside your installation package. Windows license keys are usually printed on Certificate of Authenticity stickers.

Step3:  check that your license is giving the full install option or not. You should install DVD for a full install of Windows 7.

Step4: Install your previous Windows Vista or XP, and then upgrade using the Windows 7 upgrade DVD. If you don’t want to do this and install Windows 7 on a formatted hard drive then start your computer using the Windows 7 upgrade DVD and click the Custom installation option and then click Drive Options.

Step5: If you continue to receive an error message regarding an invalid product key, you can leave the license box empty and click "Continue." Then finish the setup, however, you will have just 30 days to activate Windows. Look for a license key online.

See also: How to Resolve Windows 7 BOOTMGR Missing Error
                How to Upgrade Windows XP to Windows 7

2 Aug 2012

How to Repair a System32 Error in Windows 7

System32 is usually located under the C:\ drive in the window systems folder and hidden from users to help protect it.System32 errors occur when system file are corrupted or damaged (such as Config.nt, autoexec.nt, system32 svchost, ntoskrnl.exe, system32.dll, spoolsv.exe and command.com). To fix Windows 7 error use Windows 7 installation disc or a repair disc to repair System 32 error on the computer. Follow the given steps to fix this error.

If you want to fix  the Genuin error in windows 7 ,then follow this article-How to Fix Windows Not Genuine Error in Windows 7

How to Repair a System32 Error in Windows 7Step1:  Insert the Windows 7 install disk in the CD/DVD drive.

Step2: Restart your computer to run Safe Mode. Press the F8 key repeatedly from your keyboard. You must press F8 before the Windows logo appears. It will display the Advanced Boot Options screen.

Step3: From Advanced Boot Options screen, select "Repair Your Computer" and hit Enter.

Step4: Click “Startup Repair" to fix the System32 error and follow the onscreen instruction.

Step5: After repairing the windows will restart automatically .Press the “F” key during startup and choose the option "Start Windows Normally" and hit the Enter.

See also: How to Fix Black Screen Issue in Windows 7
                How to Fix Windows 7 Error


1 Aug 2012

How to Upgrade Windows XP to Windows 7

Windows XP users may wish to directly upgrade to Windows 7 due to advanced features and utilities available in the latter version. To upgrade you will need to back up all data on your computer, boot to the Windows 7 installation disc and perform a custom upgrade. Follow the given instruction to upgrade to Windows 7 operating system.

If you want to install windows 7 on netbook computer ,then follow this article-How to Install Windows 7 on a Netbook With No Optical Drive

Step1: Back up all files that are on your computer. First check the Windows XP version from Start menu->right-click My Computer->click Properties. If you are running a 32-bit version of Windows XP, then you can only upgrade to the 32-bit version of Windows 7. A 64-bit Windows XP version will be eligible for 64-bit Windows 7 version.
How to Upgrade Windows XP to Windows 7

Step2:  Insert the Windows 7 install disk in the CD/DVD drive and boot your computer.

Step3: Click "Install Now" and click "Get important updates for installation". If you have an active Internet connection then Windows 7 will download updates to the Windows 7 installation program.

How to Upgrade Windows XP to Windows 7Step4: To accept Terms of Use, click the check box "I accept" and then click Next.

Step5: Since Windows XP cannot be upgraded to Windows 7 directly, you will need to choose the “Custom Option” to install Windows 7.

Step6: Select the hard drive partition and Click Next -> click OK. This will begin the Windows 7 installation process. Follow the on-screen prompts to install Windows 7. You need not necessarily partition your hard drive here unless you want to dual boot. Remember, Windows XP won’t work with Windows 7 even if you dual boot.
During this procedure, your computer will boot several times which is normal. You need not be worried about it.

See also: How to Make Windows 7 Extremely Fast
                How to Fix Windows 7 Bootloader Problems