Windows 7 comes with a robust firewall included and this can be tweaked by the user according to their needs and computer resources. A firewall plays a huge role in protecting your computer from external malicious programs. So until and unless you grant permission, external programs will not be able to use the resources of your computer. A firewall can also help stop your computer from sending malicious software to other computers.
Windows Firewall comes installed on all editions of Windows XP, Windows Vista and Windows 7, and you can access its settings through the Control Panel.If you want to change your firewall setting in windows xp or vista then follow this blog.How to Change the Windows Wireless Firewall Settings
Like Windows Vista, the fundamental (basic) settings of the Windows 7 firewall can be configured from Control Panel. But unlike Windows Vista, Windows 7 allows you to tweak the advanced settings of its firewall directly from your Control Panel, instead of accessing empty MMC.
Manually Configure Your Windows 7 Firewall
Below is the procedure to manually configure the firewall Settings of Windows 7:
Step1: Click the Start button to view the Start Menu and then choose the Control Panel option.
Step2: The Control Panel window opens up. Now click on the System and Security link.
Step3: In System and Security section of Control Panel opens up and you can see the direct link for the Windows Firewall.
Step4: Click on the Windows Firewall and a new window opens up. On the left pane, you can see various links like, Change notification settings, Turn Windows Firewall on or off, Restore defaults and advanced settings etc.
On the right pane, there are two types of networks link for which you can set firewall settings. They are Home or Work (Private) networks and Public networks. By default the Firewall state is ON for both the networks.
Step5: Click on the Change Notification settings link in the Left Pane .To turn off the Windows Firewall click on the Turn off Windows Firewall option button. Click on OK button.
 Step6: To enable the default or recommended settings either click on the Use recommended settings button on the right pane or click on the Restore default link on the left pane. Click on the Restore default button and a confirmation popup opens up, Click on Yes.
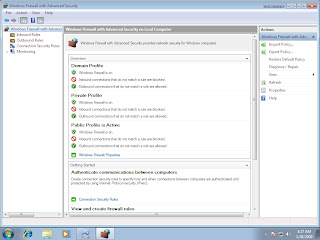
Step7: On the left pane, Click on the Advance Settings link to view or change settings. The Advanced settings for the Local Computer displays as below.
Step8: Click on the Inbound Rules link in the left pane. A list of all Inbound Rules is displayed. On clicking an enabled rule, a list of actions are shown in the Actions Pane. Click on Disable Rule to disable the selected rule. You can also Cut, Copy and Delete the rule.
Note: Same procedure is for Enabling/Disabling the Outbound Rules.
Step9: Click on the Monitoring in the left pane to monitor the settings like Active Networks, Firewall State, General Settings and Logging settings etc.
If you want to undo the changes that you have made to disable your windows firewall setting , here is guide for you How to Turn off Your Firewall in Windows 7 .
Note: I hope this guide has given you a basic idea of how to set up your firewall in Windows 7.If you are not able to work on the above steps or getting some technical problems then you can reach online technical support from V tech-squad at their Toll Free No +1-877-452-9201.
Windows Firewall comes installed on all editions of Windows XP, Windows Vista and Windows 7, and you can access its settings through the Control Panel.If you want to change your firewall setting in windows xp or vista then follow this blog.How to Change the Windows Wireless Firewall Settings
Like Windows Vista, the fundamental (basic) settings of the Windows 7 firewall can be configured from Control Panel. But unlike Windows Vista, Windows 7 allows you to tweak the advanced settings of its firewall directly from your Control Panel, instead of accessing empty MMC.
Manually Configure Your Windows 7 Firewall
Below is the procedure to manually configure the firewall Settings of Windows 7:
Step1: Click the Start button to view the Start Menu and then choose the Control Panel option.
Step2: The Control Panel window opens up. Now click on the System and Security link.
Step3: In System and Security section of Control Panel opens up and you can see the direct link for the Windows Firewall.
Step4: Click on the Windows Firewall and a new window opens up. On the left pane, you can see various links like, Change notification settings, Turn Windows Firewall on or off, Restore defaults and advanced settings etc.
On the right pane, there are two types of networks link for which you can set firewall settings. They are Home or Work (Private) networks and Public networks. By default the Firewall state is ON for both the networks.
Step5: Click on the Change Notification settings link in the Left Pane .To turn off the Windows Firewall click on the Turn off Windows Firewall option button. Click on OK button.
 Step6: To enable the default or recommended settings either click on the Use recommended settings button on the right pane or click on the Restore default link on the left pane. Click on the Restore default button and a confirmation popup opens up, Click on Yes.
Step7: On the left pane, Click on the Advance Settings link to view or change settings. The Advanced settings for the Local Computer displays as below.
Step8: Click on the Inbound Rules link in the left pane. A list of all Inbound Rules is displayed. On clicking an enabled rule, a list of actions are shown in the Actions Pane. Click on Disable Rule to disable the selected rule. You can also Cut, Copy and Delete the rule.
Note: Same procedure is for Enabling/Disabling the Outbound Rules.
Step9: Click on the Monitoring in the left pane to monitor the settings like Active Networks, Firewall State, General Settings and Logging settings etc.
If you want to undo the changes that you have made to disable your windows firewall setting , here is guide for you How to Turn off Your Firewall in Windows 7 .
Note: I hope this guide has given you a basic idea of how to set up your firewall in Windows 7.If you are not able to work on the above steps or getting some technical problems then you can reach online technical support from V tech-squad at their Toll Free No +1-877-452-9201.
No comments:
Post a Comment