Using a virtual hard drive, you can take a backup of your important data on your PC that you don’t want to lose. It is very useful for a network. The entire data that all computers and devices have on a given network can be stored on a Windows 7 VHD. In this way, multiple computers can have their backups on one computer on the network and then they all can have a consolidated backup saved on a single external hard drive (see: How to use backup and restore in windows 7). This is useful for single PC users as well. Follow the given steps to create a backup of system data to a virtual hard drive in windows 7.
If you want to partition hard drive in windows 7 then follow this article-How to Partition Hard Drive in Windows 7 Computer
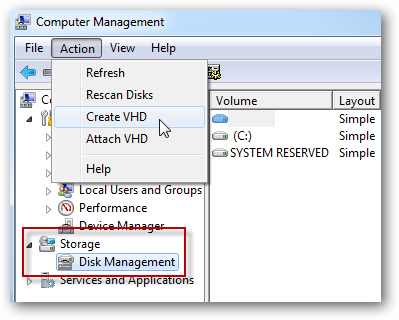
 Step1: From Start menu, right-click on Computer and select Manage. When the Computer Management screen opens, under Storage highlight Disk Management, click on Action and then Create VHD.
Step2: Select the location of the computer where your virtual hard drive will be placed and mention the size of it. It can be created on the local hard drive or external drive. You also need to decide whether you want it to be dynamic or with a fixed size.
Step3: Now you will see the virtual drive listed as an unknown & unallocated space in the Disk Management window. Right-click it and select Initialize disk option. Also right click the unallocated area and select New Simple Volume.
Step4: The New Simple Volume Wizard opens up and now you can select to format the volume and give it a Volume label and click Next.
Step5: Once you have completed these steps, you will see the new VHD listed under Hard disk drives in computer. Now you can use it for the data backup.
See also: How to Use USB Flash Drive As RAM in Windows 7
How to Make Windows 7 Bootable USB
If you want to partition hard drive in windows 7 then follow this article-How to Partition Hard Drive in Windows 7 Computer
Step2: Select the location of the computer where your virtual hard drive will be placed and mention the size of it. It can be created on the local hard drive or external drive. You also need to decide whether you want it to be dynamic or with a fixed size.
Step3: Now you will see the virtual drive listed as an unknown & unallocated space in the Disk Management window. Right-click it and select Initialize disk option. Also right click the unallocated area and select New Simple Volume.
Step4: The New Simple Volume Wizard opens up and now you can select to format the volume and give it a Volume label and click Next.
Step5: Once you have completed these steps, you will see the new VHD listed under Hard disk drives in computer. Now you can use it for the data backup.
See also: How to Use USB Flash Drive As RAM in Windows 7
How to Make Windows 7 Bootable USB
No comments:
Post a Comment